반응형

출처:이것이 자바다 

연산자

3.1 연산자와 연산식

프로그램에서 데이터를 처리하여 결과를 산출하는 것을 연산(Operations)이라고 한다.

연산자(Operator) : 연산에 사용되는 표시나 기호

피연산자(Operand ) : 연산되는 데이터

연산식(expressions) : 연산자와 피연산자를 이용하여 연산의 과정을 기술한 것

예를 들어 다음 연산식에서 +, -, *, ==은 연산자이고 x, y, z 변수는 피연산자이다.


자바 언어에서는 다양한 연산자를 제공하고 있다.이 연산자들은 피연산자를 연산해서 값을 산출하는데, 산출되는 값의 타입은 연산자별로 다르다.


산술연산자

비교연산자


단항, 이항 ,삼항 연산자

단항 연산자 : 부호 연산자와 증가/감소 연산자는 피연산자 하나만을 요구하므로

++x;

이항 연산자 : 그 이외의 연산자는 두개의 피연산자를 요구

x + y;

삼항 연산자 : 조건 연산자는 조건식 A,B와 같이 세 개의 피연산자가 필요함

(sum > 90) ? "A" :"B";


연산식은 반드시 하나의 값을 산출한다.

int result = x+y;


연산식은 다른 연산식의 피연산자 위치에도 올 수 있ㄷ.

boolean result = (x+y) < 5;


3.2 연산의 방향과 우선순위

대부분의 연산자느 왼쪽에서 부터 오른쪽으로 (->) 연산을 시작한다.

100 * 2 / 3 % 5  => 1


하지만 단항 연산자(++, --, ~ , ! ), 부호 연산자(+, -) 대입 연산자 ( =, += , -= , ...) 오른쪽에서 왼쪽 (<-)으로 연산된다.

a = b = c = 5

위 연산식은 c = 5, b= 5, a = 5 순서로 실행된다.


우선순위 정리한 표


괄호()를 사용해서 먼저 처리해야 할 연산식을 묶는 것이 좋다.


만약 var1 + var2먼저 진행하고 싶다면 :

1. 단항, 이항, 삼항 연산자 순으로 우선순위를 가진다.

2. 산술, 비교, 논리, 대입 연산자 순으로 우선순위를 가진다.

3. 단항과 대입 연산자를 제외한 모든 연산의 방향은 왼쪽에서 오른쪽이다(→).

4. 복잡한 연산식에는 괄호()를 사용해서 우선순위를 정해준다


3.3 단항연산자

피연사가 단 하나뿐인 연산자

부호 연산자 (+, - ) , 증감 연산자(++, --) ,논리 부정 연산자 (!) , 비트 반전 연산자 (~)


3.3.1 부호 연산자(+,-)

연산식

설명

+

피연산자

피연산자의 부호 유지

-

피연산자

피연산자의 부호 변경


+, -는 산술 연산자이기도 하고 , 부호 연산자이기도 하다.

부호 연산자로 쓰일 때에는 하나의 피연산자만 필요하다.일반적으로 부호 연산자를 다음과 같이 정수 및 실수 리터럴 앞에 붙여 양수 및 음수를 표현한다.

int i1 = +100;

int i2 = -100;

double d1 = +3.14;

double d2 = -10.5;


부호 연산자를 정수 또는 실수 타입 변수 앞에 붙일 수 도 있다.이 경우는 변수를 양수 및 음수로 표현한 것이 아니고 ,변수 값의 부호를 유지하거나 바꾸기 위해 사용된다.

+연산자는 변수 값의 부호를 유지한다.

-연산자는 변수 값의 부호를 양수는 음수로 , 음수는 양수로 바꾼다.

int x = -100;

int result1 = +x; //-100

int result2 = -x; //100


부호 연산자를 사용할 때 주의할 점은 부호 연산자의 산출 타입은 int타입이 된다는 것이다.

short s = 100;

short result = -s;//컴파일 에러 short타입 값을 부호 연산하면 int타입 값으로 바뀐다.

=>

shors s = 100;

int reuslt3 = -s;


부호 연산자

[SignOperatorExample.java] 부호 연산자

public class SignOperatorExample {


           public static void main(String[] args) {

                       int x = -100;

                       int result1 = +x;

                       int result2 = -x;

                       System.out.println("result1=" + result1);

                       System.out.println("result2=" + result2);


                       short s = 100;

                       //short result3 = -s//컴파일 에러

                       int reuslt3 = -s;

                       System.out.println("reuslt3=" + reuslt3);


           }


}


3.3.2 증감 연산자(++,--)

연산식

설명

++

피연산자

다른 연산을 수행하기 전에 피연산자의  값을 1 증가시킴

--

피연산자

다른 연산을 수행하기 전에 피연산자의  값을 1 감소시킴

피연산자

++

다른 연산을 수행한 후에 피연산자의 값을 1 증가시킴

피연산자

--

다른 연산을 수행한 후에 피연산자의 값을 1 감소시킴


증감 연산자가 변수 앞에 있으면 우선 변수를 1증가 또는 1감소시킨 후에 다른 연산자와 계산한다.

증감 연산자가 변수 뒤에 있으면 다른 연산자를 먼저 처리한 후 변수를 1증가 또느 1감소시킨다.

int x = 1;

int y = 1;

int result1 = ++x + 10;//12

int reuslt2 = y++ + 10;//11


증감연산자


[IncreaseDecreaseOperatorExample.java] 증감 연산자

public class IncreaseDecreaseOperatorExample {


           public static void main(String[] args) {

                       int x = 10;

                       int y = 10;

                       int z;


                       System.out.println("-------------------------------");

                       x++;

                       ++x;

                       System.out.println("x="+x);


                       System.out.println("-------------------------------");

                       y--;

                       --y;

                       System.out.println("y="+y);


                       System.out.println("-------------------------------");

                       z = x++;

                       System.out.println("z="+z);

                       System.out.println("x="+x);


                       System.out.println("-------------------------------");

                       z = x++;

                       System.out.println("z="+z);

                       System.out.println("x="+x);


                       System.out.println("-------------------------------");

                       z = ++x + y++;

                       System.out.println("z="+z);

                       System.out.println("x="+x);

                       System.out.println("y="+y);

           }

}


++i  i = i+1


3.3.3 논리 부정 연산자(!)

boolean 타입에만 사용가능


조건문과 제어문에서 사용되고 두가지 상태 (true/false)를 번갈아가면 변경하는 토글(toggle)기능을 구현할 때도 주로 사용한다.


논리 부정 연산자

[DenyLogicOperatorExample.java] 논리 부정 연산자

public class DenyLogicOperatorExample {


           public static void main(String[] args) {

                       boolean play = true;

                       System.out.println(play);


                       play = !play;

                       System.out.println(play);


                       play = !play;

                       System.out.println(play);

           }


}


3.3.4 비트 반전 연산자(~)

정수타입( byte, short,int,long)의 피연산자에만 사용되며 , 피연산자를 2진 수로 표현했을 때 비트값은 01, 10으로 반전한다. 연산후 , 부호 비트인 치상위 비트를 포함해서 모든 비트가 반전되기 때문에 ,부호가 반대인 새로운 값이 산출된다.


피연산자는 연산을 수행하기 전에 int타입으로 변환되고 , 비트 반전이 일어난다.


byte v1 =10;

byte v2 = ~v1;//컴파일 에러

=>

byte v1 =10;

int = ~v1;


비트 반전 연산자의 결과를 이용하면 부호가 반대인 정수를 구할 수 도 있다.

byte v1 = 10;

int v2 = ~v1 + 1;//-10 v2에 저장


자바는 정수값을 총 32비트의 이진 문자열로 리턴하는 Integer.toBinaryString()메소드를 제공한다.

String v1BinaryString = Integer.toBinaryString(10);

리턴하는 str의 문자수를 조사해서 32보다 작으면 앞에 0을 붙이도록 한 것이다.

           public static String toBinaryString(int value) {

                       String str  = Integer.toBinaryString(value);

                       while(str.length() < 32) {

                                  str = "0" + str;

                       }

                       return str;

           }


비트 반전 연산자

[BitReverseOperatorExample.java] 비트 반전 연산자

public class BitReverseOperatorExample {


           public static void main(String[] args) {

                       int v1 = 10;

                       int v2 = ~v1;

                       int v3 = ~v1 + 1;


                       System.out.println(toBinaryString(v1) + "(십진수 : " + v1 +")");

                       System.out.println(toBinaryString(v2) + "(십진수 : " + v2 +")");

                       System.out.println(toBinaryString(v3) + "(십진수 : " + v3 +")");

                       System.out.println();


                       int v4 = -10;

                       int v5 = ~v4;

                       int v6 = ~v4 + 1;

                       System.out.println(toBinaryString(v4) + "(십진수 : " + v4 +")");

                       System.out.println(toBinaryString(v5) + "(십진수 : " + v5 +")");

                       System.out.println(toBinaryString(v6) + "(십진수 : " + v6 +")");


           }


           public static String toBinaryString(int value) {

                       String str  = Integer.toBinaryString(value);

                       while(str.length() < 32) {

                                  str = "0" + str;

                       }

                       return str;

           }


}


3.4 이항 연산자

피연산자가 2개인 연산자

    • 종류

      산술 연산자: +, -, *, /, %

      문자열 연결 연산자: +

      대입 연산자: =,  +=,  -=,  *=,  /=,  %=, &=, ^=, |=, <<=, >>=, >>>=

      비교 연산자: <, <=, >, >=, ==, !=

      논리 연산자: &&, ||, &, |, ^, !

      비트 논리 연산자: &, |, ^

      비트 이동 연산자: <<, >>, >>>


3.4.1 산술 연산자(+, -, *, /, %)


이 산술 연산자는 boolean타입을 제외한 모든 기본 타입에 사용할 수 있다.


산술 연산자의 특징은 피연산자들의 타입이 동일하지 않을 경우 다음과 같은 규칙을 사용해서 피연산자들의 타입을 일치시킨 후 연산을 수행한다.

1)피연산자들이 모두 정수 타입이고 ,int 타입(4byte) 보다 크기가 작은 타입일 경우 모두 int타입으로 변환후 , 연산을 수행한다. 따라서 연산의 산출 타입은 int이다.

 byte + byte -> int + int  = int

2)피연산들이 모두 정수 타입이고 ,long타입이 있을 경우 모두 long타입으로 변환후 , 연산을 수행한다. 따라서 연산의 산출 타입은 long이다.

int + long -> long + long = long

3)피연산자 중 실수 타입(float타입, double타입) 이 있을 경우 , 크기가 큰 실수 타입으로 변환 후 ,연산을 수행한다. 따라서 연산의 산출 타입은 실수 타입이다.

int + double -> double + double = double


long타입을 제외한 정수의 산술 연산은 무조건 int타입으로 변환 후 연산을 수행하고 ,산출 타입이 int이기 때문에 int타입 변수에 산출값을 대입해야 한다.

                       byte byte1 =1;

                       byte byte2 = 1;

                       byte byte3 = byte1 + byte2; //컴파일 오류

======>수정

int byte3 = byte1+byte2;

이유는 자바 가상 기계(JVM)가 기본적으로 32비트 단위로 계산하기 때문이다.


                       int int1 = 10;

                       int int2 = 4;

                       int result2 = int1/ int2; //2

                       double result3 = int1 /int2; //2.0


double 타입으로 강제 타입 변환(캐스팅)한 후 산술 연산을 하면 된다.

double result3 = (int* 1.0)/ int2;

double result3 = (double) int1/int2;

double reuslt3 = int1/ (double) int2;


산술 연산자

[ArithmeticOperatorExample.java] 산술 연산자

public class ArithmeticOperatorExample {


           public static void main(String[] args) {

                       int v1 = 5;

                       int v2 = 2;


                       int result1 = v1+v2;

                       System.out.println("result1="+result1);


                       int result2 = v1-v2;

                       System.out.println("result2="+result2);


                       int result3 = v1*v2;

                       System.out.println("result3="+result3);


                       int result4 = v1/v2;

                       System.out.println("result4="+result4);


                       int result5 = v1%v2;

                       System.out.println("result5="+result5);


                       double result6 = (double)v1/v2;

                       System.out.println("result6="+result6);

           }


}


char타입 ->int타입이다.

char타입 연산

[CharOperatorExample.java] char 타입 연산

public class CharOperatorExample {


           public static void main(String[] args) {

                       char c1 = 'A'+1;

                       char c2 = 'A';

                       //char c3 c2 +1;//컴파일 에러

                       System.out.println("c1:"+c1);

                       System.out.println("c2:"+c2);

           }


}

리터럴 간의 연산은 타입 변환 없이 해당 타입으로 계산

char c1 = 'A'+1;


//int타입으로 변환

char c2 = 'A';

char c3 c2 +1;//컴파일 에러

=>

char c3 = (char)(c2+1);

올바른 계산을 위해 값을 미리 검정해야 하고 ,정확한 계산을 위해 실수 타입을 피해야 하며 , 특수값 처리에 신경 써야 한다.


=>오버플로우 탐지

산술 타입으로 표현할 수 없는 값이 산출되었을 경우 ,오버플로우가 발생하고 쓰게기값(엉뚱한 값)을 얻을 수 있기 때문이다.

[ OverflowExample.java]오버플로우

public class OverflowExample {

       public static void main(String[] args) {

               int x = 1000000;

               int y = 1000000;

               int z = x * y;

               System.out.println(z);

       }

}

컴파일 에러는 발생하지 않지만 ,변수 z에서는 올바른 값이 저장되지 않는다.


[ OverflowExample.java ]오버플로우 해결

public class OverflowExample {

       public static void main(String[] args) {

               //int x = 1000000;

               //int y = 1000000;

               //int z = x * y;

               //System.out.println(z);


               long x = 1000000;

               long y = 1000000;

               long z = x * y;

               System.out.println(z);

       }

}


[CheckOverflowExample.java]산술 연산 전에 오버플로우를 탐지 : 메소드로 오버플로우 확인

public class CheckOverflowExample {


       public static void main(String[] args) {

               try {

                      int result = safeAdd(2000000000,2000000000);

                      System.out.println(result);

               }catch(ArithmeticException e) {

                      System.out.println("오버플로우가 발생하여 정확하게 계산할 없음");

               }

       }


       public static int safeAdd(int left, int right) {

               if((right > 0)) {

                      if(left > (Integer.MAX_VALUE - right)) {

                             throw new ArithmeticException("오버플로우 발생");

                      }

               }else {

                      if(left < (Integer.MIN_VALUE - right)) {

                             throw new ArithmeticException("오버플로우 발생");

                      }

               }

               return left + right;

       }

}


=>정확한 계산은 정수 사용

부동소수점(실수) 타입을 사용하지 않는 것이 좋다.


[ AccuracyExample1.java]정확하게 계산할 때에는 부동소수점 타입을 사용하지 않는다.

public class AccuracyExample1 {


       public static void main(String[] args) {

               int apple = 1;

               double pieceUnit = 0.1;

               int number = 7;


               double result = apple - number *pieceUnit;

               System.out.println("사과 한개에서 ");

               System.out.println("0.7 조각을 빼면, ");

               System.out.println(result + "조각이 남는다.");

       }


}

근사치로 처리 하기 때문이다.


[AccuracyExample2.java]정확하게 계산할 때에는 부동소수점 타입을 사용하지 않는다.

public class AccuracyExample2 {


           public static void main(String[] args) {

                       int apple = 1;


                       int totalPieces = apple * 10;

                       int number = 7;

                       int temp = totalPieces - number;


                       double result = temp / 10.0;


                       System.out.println("사과 한개에서 ");

                       System.out.println("0.7 조각을 빼면, ");

                       System.out.println(result + "조각이 남는다.");

           }


}


=>NaNInfinity연산

/ 또는 % 연산자를 사용할 떄도 주의 할 점 이 있다.

5 / 0  ->ArighmeticException예외 발생

5 % 0 ->ArighmeticException예외 발생


예외처리 를 하는게 좋다.

try{

           //int z = x /y ;

           int z = x % y ;

           System.out.println("z:" + z);

}catch(AirthmeticException e){

           System.out.println("0으로 나누면 안됨");

}


실수 타입은 0.0 또는 0.0f 로 나누면 AirthmeticException이 발생하지 않고 , /연산의 결과는 Infinity(무한대) 값을 가지며 , %연산의 결과는 NaN(Not a Number) 을 가진다.

5 / 0.0 ->Infinity

5 % 0.0 ->NaN


Infinity + 2 -> Infinity

NaN + 2 -> NaN


/%연산의 결과가 Infinity또는 NaN인지 확인하려면 Double.isInfinite()Double.isNaN() 메소드를 이용하면 됩니다.

[ InfinityAndNaNCheckExample.java] InfinityNaN

public class InfinityAndNaNCheckExample {


           public static void main(String[] args) {

                       int x = 5;

                       double y = 0.0;


                       double z = x / y;

                       //double z = x % y;


                       System.out.println(Double.isInfinite(z));

                       System.out.println(Double.isNaN(z));


                       System.out.println(z + 2); //문제가 되는 코드

           }


}


if(Double.isInfinite(z) ||  Double.isNaN(z) ){


       System.out.println(" 산출 불가");

}else{

       System.out.println(z + 2);

}


=>입력값의 NaN 검사

부동소수점(실수)을 입력받을 때는 반드시 NaN 검사를 해야 한다.

[ InputDataCheckNaNExample1.java] "NaN" 문자열의 문제점

public class InputDataCheckNaNExample1 {


       public static void main(String[] args) {

               String userInput = "NaN";

               double val = Double.valueOf(userInput);


               double currenBalance = 10000.0;


               currenBalance += val;

               System.out.println(currenBalance);

       }


}


[ InputDataCheckNaNExample2.java] "NaN"을 체크하고 연산 수행

public class InputDataCheckNaNExample2 {


       public static void main(String[] args) {

               String userInput = "NaN";

               double val = Double.valueOf(userInput);


               double currenBalance = 10000.0;


               if(Double.isNaN(val)) {

                      System.out.println("NaN 입력되어 처리할 없음.");

                      val = 0.0;

               }


               currenBalance += val;

               System.out.println(currenBalance);

       }


}


3.4.2 문자열 연결 연산자(+)

문자열 연결 연산자인 +는 문자열을 서로 결합하는 연산자이다.

                  String str1 = "JDK" + 6.0;

                       String str2 = str1 + "특징";


왼쪽에서 부터 오른쪽으로 연산이 진행된다.

"JDK" + 3 + 3.0;


3 + 3.0 +"JDK";


[ StringConcatExample.java]문자열 연결 연산자

public class StringConcatExample {


       public static void main(String[] args) {

               String str1 = "JDK" + 6.0;

               String str2 = str1 + "특징";

               System.out.println(str2);


               String str3 = "JDK" + 3 + 3.0;

               String str4 = 3 + 3.0 +"JDK";

               System.out.println(str3);

               System.out.println(str4);

       }


}


3.4.3 비교연산자(<.<=,>,>=, == . !=)

boolean타입인 true/flase를 산출한다.

대소(<, <=, >, >=) 또는 동등(==, !=) 비교해 boolean 타입인 true/false 산출


    • 동등 비교 연산자는 모든 타입에 사용
    • 크기 비교 연산자는 boolean 타입 제외한 모든 기본 타입에 사용
    • 흐름 제어문인 조건문(if), 반복문(for, while)에서 주로 이용

      실행 흐름을 제어할 때 사용

만약 피연산자가 char타입이면 유니코드 값으로 비교 연산을 수행한다.

 ('A' < 'B')  ----------> (65 < 66)


[CompareOperatorExample1.java]비교 연산자

public class CompareOperatorExample1 {


       public static void main(String[] args) {

               int num1 = 10;

               int num2 = 10;

               boolean result1 = (num1 == num2);

               boolean result2 = (num1 != num2);

               boolean result3 = (num1 <= num2);

               System.out.println("result1=" + result1);

               System.out.println("result2=" + result2);

               System.out.println("result3=" + result3);


               char char1 = 'A';

               char char2 = 'B';

               boolean result4 = (char1 < char2);

               System.out.println("result4=" + result4);

       }


}


비교 연산자에서도 연산을 수행하기 전에 타입 변환을 통해 피연산자의 타입을 일치시킨다.

'A' == 65 ->true

3 == 3.0 ->true


그러나 한가지 예외가 있다.

0.1 == 0.1f ->false

이유는 이진 포맷의 가수를 이용하는 모든 부동소수점 타입은 0.1을 정확히 표현할 수가 없어서 0.1f0.1의 근사값으로 표현


[ CompareOperatorExample2.java] 비교 연산자

public class CompareOperatorExample2 {

       public static void main(String[] args) {

        int v2 = 1;

        double v3 = 1.0;

        System.out.println(v2 == v3); //true


        double v4 = 0.1;

        float v5 = 0.1f;

        System.out.println(v4 == v5); //false

        System.out.println((float)v4 == v5); //true

        System.out.println((int)(v4*10) == (int)(v5*10)); //true

    }

}


=>문자열 비교

String타입의 문자열을 비교할 때는 대소 (<, <= , > , >=)연산자를 사용할 수 없고 , 동등(== , != ) 비교 연산자는 사용할 수 있으나 같은지 ,다른지를 비교하는 용도로는 사용되지 않는다.

String strVar1 = "신용권";

String strVar2 = "신용권";

String strVar3 = new String("신용권");


자바는 문자열 리터럴이 동일하다면 동일한 String 객체를 참조하도록 되어 있다. strVar1strVar2는 동일한 String객체의 번지값을 가지고 있다. 그러나 strVar2은 객체 생성 연산자인 new로 생성한 새로운 String객체의 번지값을 가지고 있다.

strVar1 == strVar2 ->true

strVar2 == strVar3 ->false

equals()메소드는 원본 문자열과 매개값으로 주어진 비교 문자열이 동일한지 비교한 후 true또는 false를 리턴한다.

boolean result = str1.equals(str2);

아래 것으로 변경=>

strVar1.equals(strVar2)

strVar2.equals(strVar3)


[ StringEqualsExample.java] 문자열 비교

public class StringEqualsExample {

       public static void main(String[] args) {

               String strVar1 = "신민철";

               String strVar2 = "신민철";

               String strVar3 = new String("신민철");


               System.out.println(strVar1 == strVar2);

               System.out.println(strVar1 == strVar3);

               System.out.println();

               System.out.println(strVar1.equals(strVar2));

               System.out.println(strVar1.equals(strVar3));

       }

}


3.4.4 논리 연산자 (&&, || , & , |, ^, !)


논리곱(&&), 논리합(||), 배타적 논리합(^) ,논리 부정(!) 연산 수행

피연산자는 boolean 타입만 사용 가능

&& 는 앞의 피연산자가 false라면 뒤의 모든 피연사자를 평가하지 않고 바로 false라는 산출 결과를 낸다.

그러나 &는 두 피연사자 모두를 평가해서 산출 결과를 낸다.

|| 는 앞의 피연산자가 true라면 뒤의 모든 피연사자를 평가하지 않고 바로 true라는 산출 결과를 낸다.

그러나 |는 두 피연사자 모두를 평가해서 산출 결과를 낸다.


[ LogicalOperatorExample.java]논리 연산자

public class LogicalOperatorExample {

       public static void main(String[] args) {

               int charCode = 'A';


               if ((charCode >= 65) & (charCode <= 90)) {

                      System.out.println("대문자 이군요");

               }


               if ((charCode >= 97) && (charCode <= 122)) {

                      System.out.println("소문자 이군요");

               }


               if (!(charCode < 48) && !(charCode > 57)) {

                      System.out.println("0~9 숫자 이군요");

               }


               int value = 6;


               if ((value % 2 == 0) | (value % 3 == 0)) {

                      System.out.println("2 또는 3 배수 이군요");

               }


               if ((value % 2 == 0) || (value % 3 == 0)) {

                      System.out.println("2 또는 3 배수 이군요");

               }

       }

}


3.4.5 비트 연산자(&, |, ^, ~, <<, >>, >>>)

비트(bit) 단위로 연산 하므로 0 1이 피연산자

                               0 1로 표현이 가능한 정수 타입만 비트 연산 가능

                               실수 타입인 float double은 비트 연산 불가

    • 종류

      비트 논리 연산자(&, |, ^, ~)

      비트 이동 연산자(<<, >>, >>>)


=>비트 논리 연산자(&, |, ^, ~)

피 연산자가 boolean타입일 경우 일반 논리 연산자

피연산자가 정수 타입일 경우 비트 논리 연산자로 사용

비트 연산자는 피연산자를 int타입으로 자동 타입 변환 후 연산 수행


4525 관련 계산


byte num1 = 45;

byte num2 = 25;

byte result = num1 & num2 ; //컴파일 에러 => int result = num1 & num2;

int로 계산한다


[ BitLogicExample.java ]비트 논리 연산자

public class BitLogicExample {

       public static void main(String[] args) {

               System.out.println("45 & 25 = " + (45 & 25));

               System.out.println("45 | 25 = " + (45 | 25));

               System.out.println("45 ^ 25 = " + (45 ^ 25));

               System.out.println("~45 = " + (~45));

       }

}


=>비트 이동 연산자(<<, >>, >>>)

정수 데이터의 비트를 좌측 또는 우측으로 밀어 이동시키는 연산 수행


좌측 이동 연산자를 이용하여 중수 13비트만큼 왼쪽으로 이동

int result = 1  << 3;


-83비트 만큼 오르쪽으로 이동

int result = -8 >> 3


int result = -8 >>> 3


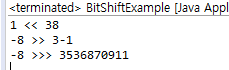
[ BitShiftExample.java ]비트 이동 연산자

public class BitShiftExample {


       public static void main(String[] args) {

               System.out.println("1 << 3" + (1 << 3));

               System.out.println("-8 >> 3" + (-8 >> 3));

               System.out.println("-8 >>> 3" + (-8 >>> 3));

       }


}


3.4.6 대입 연산자(=,  +=,  -=,  *=,  /=,  %=, &=, ^=, |=, <<=, >>=, >>>=)

오른쪽 피연산자의 값을 좌측 피연산자인 변수에 저장

모든 연산자들 중 가장 낮은 연산 순위 -> 제일 마지막에 수행

오늘쪽 피연사자는 리터럴 및 변수 ,그리고 다른 연산식이 올 수 있다.

단순히 오른쪽 피 연산자의 값을 변수에 저장하는 단순 대입연사자가 있고, 정해진 연산을 수행한 후 결과를 변수에저장하는 복합 대입 연산자도 있다.

    • 종류

      단순 대입 연산자

      복합 대입 연산자

 정해진 연산을 수행한 후 결과를 변수에 저장

a = b = c = 5

순서 1) c = 5

     2) b = c = 5

     3) a = b = c = 5


대입 연산자의 종류


[ AssignmentOperatorExample.java] 대입 연산자

public class AssignmentOperatorExample {

       public static void main(String[] args) {

               int result = 0;

               result += 10;

               System.out.println("result=" + result);

               result -= 5;

               System.out.println("result=" + result);

               result *= 3;

               System.out.println("result=" + result);

               result /= 5;

               System.out.println("result=" + result);

               result %= 3;

               System.out.println("result=" + result);

       }

}


3.5 삼항 연산자

세 개의 피연산자를 필요로 하는 연산자

앞의 조건식 결과에 따라 콜론 앞 뒤의 피연산자 선택 -> 조건 연산식


[ ConditionalOperationExample.java]삼항 연산자

public class ConditionalOperationExample {

    public static void main(String[] args){

        int score =85;

        char grade = (score > 90) ? 'A' : ((score > 80 ? 'B' : 'C'));

        System.out.println(score + " " + grade);

    }

}


연습문제

1. 연산자와 연산식에 대한 설명 중 틀린 것은 무엇입니까?


1. 연산자는 피연산자의 수에 따라 단항, 이항, 삼항 연산자로 구분된다.

2.비교 연산자와 논리 연산자의 산출 타입은 boolean (true/false) 이다.

3.연산식은 하나 이상의 값을 산출할 수도 있다.

4.하나의 값이 올 수 있는 자리라면 연산식도 올 수 있다.


2. 다음 코드를 실행했을 때 출력 결과는 무엇입니까?


package sec3;


public class Exercise02 {

    public static void main(String[] args) {

        int x = 10;

        int y = 20;

        int z = (++x) + (y--);

        System.out.println(z);

    }


}


3. 다음 코드를 실행했을 때 출력 결과는 무엇입니까?

package sec3;


public class Exercise03 {


    public static void main(String[] args) {

        int score = 85;

        String result = (!(score>90))? "":"";

        System.out.println(result);

    }

}


4. 534자루의 연필을 30명의 학생들에게 똑같은 개수로 나누어 줄 때 학생당 몇 개를 가질 수 있고, 최종적으로 몇 개가 남는지를 구하는 코드입니다. ( #1 ) ( #2 )에 들어갈 알맞은 코드를 작성하세요.

package sec3;


public class Exercise04 {


    public static void main(String[] args) {

        int pencils = 534;

        int students = 30;


        //학생  명이 가지는 연필 

        int pencilsPerStudent = ( #1 );

        System.out.println(pencilsPerStudent);


        //남은 연필 

        int pencilsLeft = ( #2 );

        System.out.println(pencilsLeft);

    }

}


#1 = pencils / students

#2 = pencils % students


5. 다음은 십의 자리 이하를 버리는 코드입니다. 변수 value의 값이 356이라면 300이 나올 수 있도록 ( #1 ) 에 알맞은 코드를 작성하세요(산술 연산자만 사용하세요).

package sec3;


public class Exercise05 {

    public static void main(String[] args) {

        int value = 356;

        System.out.println( #1 );

    }

}


#1 = value /100 * 100


6. 다음 코드는 사다리꼴의 넓이를 구하는 코드입니다. 정확히 소수자릿수가 나올 수 있도록 ( #1 ) 에 알맞은 코드를 작성하세요.

package sec3;


public class Exercise06 {


    public static void main(String[] args) {

        int lengthTop = 5;

        int lengthBottom = 10;

        int height = 7;

        double area = ( #1 );

        System.out.println(area);

    }


}


#1 = 7 * (lengthTop+lengthBottom)/2


7. 다음 코드는 비교 연산자와 논리 연산자의 복합 연산식입니다. 연산식의 출력 결과를 괄호( ) 속에 넣으세요.

package sec3;


public class Exercise07 {


    public static void main(String[] args) {

        int x = 10;

        int y = 5;


        System.out.println((x>7&& (y<=5));

        System.out.println((x%3 ==2|| (y%2 != 1));

    }

}


8. 다음은 % 연산을 수행한 결과값에 10을 더하는 코드입니다. NaN 값을 검사해서 올바른 결과가 출력될 수 있도록 ( #1 ) 에 들어갈 NaN을 검사하는 코드를 작성하세요.

package sec3;


public class Exercise08 {

    public static void main(String[] args) {

        double x =5.0;

        double y =0.0;


        double z = x % y;


        if(#1) {

            System.out.println("0.0으로 나눌  없습니다.");

        } else {

            double result = z + 10;

            System.out.println("결과: " + result);

        }

    }

}


반응형

' > 이것이 자바다' 카테고리의 다른 글

06. 클래스  (0) 2020.09.28
05. 참조 타입  (0) 2020.09.27
04. 조건문과 반복문  (0) 2020.09.26
02.변수와 타입  (1) 2020.09.22
01. 자바 시작하기  (0) 2020.09.20
반응형


Python IDLE사용

3. 프로그램 구조, 제어문

I. if

“돈이 있으면 택시를 타고, 돈이 없으면 걸어 간다.”

주어진 조건을 판단하여 해당 조건에 맞는 상황을 수행하는데 if문이 쓰임

>>> money = 1

>>> if money:

           print("택시를 타고 가라")

else:

           print("걸어 가라")


=>if문의 기본 구조

if 조건문 뒤에는 반드시 콜론(:)이 붙임

조건문을 테스트해서 참이면 if문 바로 다음의 문장(if 블록)들을 수행하고, 조건문이 거짓이면 else문 다음 문장(else 블록)들을 수행하게 됨

블록은 들여쓰기로 해결함 (다른 언어는 { }로 기호 사용) 

else문은 if문 없이 독립적으로 사용할 수 없음


=>들여쓰기

if 조건문:

수행할 문장1

수행할 문장2

수행할 문장3

들여쓰기는 공백(Spacebar) 4개나 탭(Tab)을 사용하며, 2가지를 혼용하지 말 것

>>> money = 1

>>> if money:

           print("택시콜")

print("타고")

>>> money = 1

>>> if money:

           print("택시콜")

           print("타고")

                       print("가자")


=>조건문이란 무엇인가?

if 조건문에서조건문이란 참과 거짓을 판단하는 문장을 말함

>>> money = 1

>>> if money:

money 1이기 때문에 참이 되어 if문 다음의 문장을 수행함


=>비교연산자

조건문에 비교연산자(<, >, ==, !=, >=, <=)를 쓰는 경우가 많음

>>> x= 3

>>> y =2

>>> x>y

>>> x<y

>>> x == y

>>> x != y

만약 3000원 이상의 돈을 가지고 있으면 택시를 타고 그렇지 않으면 걸어 가라.

>>> money = 2000

>>> if money >= 3000:

           print("택시를 타고 가라")

else:

           print("걸어 가라")


=> and, or, not

조건을 판단하기 위해 사용하는 연산자로는 and, or, not이 있

and, or, not 조건을 판단하기 위해 사용하는 연산자로는 and, or, not이 있음->논리 연산자

==> or 연산자의 사용법을 알아봄

돈이 3000원 이상 있거나 카드가 있으면 택시를 타고 그렇지 않으면 걸어 가라.

>>> money = 2000

>>> card = 1

>>> if money >= 3000 or card:

           print("택시를 타고 가라")

else:

           print("걸어 가라")

>>> money = 2000

>>> card = 1

>>> if money >= 3000 and card:

           print("택시를 타고 가라")

else:

           print("걸어 가라")

>>> money = 2000

>>> if money >= 3000:

           print("택시를 타고 가라")

else:

           print("걸어 가라")

money = 2000

if money >= 3000:

    print("택시를 타고 가라")

=>x in s, x not in s

다른 프로그래밍 언어에서 볼 수 없는 조건문들을 제공함

in의 뜻이 ‘~안에라는 것을 생각하면 쉽게 이해될 것임

>>> 1 in [1,2,3]

>>> 1 not in [1,2,3]


튜플과 문자열에 적용한 예

>>> 'a' in ('a','b','c')

>>> 'j' not in 'python'


=>택시 예제에 in을 적용

만약 주머니에 돈이 있으면 택시를 타고, 없으면 걸어가라.

>>> pocket =['paper','cellphone','money']

>>> if 'money' in pocket:

           print("택시를 타고 가라")

else:

           print("걸어 가라")


=>조건문에서 아무 일도 하지 않게 설정하고 싶다면?

주머니에 돈이 있으면 가만히 있고 주머니에 돈이 없으면 카드를 꺼내라.

>>> pocket =['paper','cellphone','money']

>>> if 'money' in pocket:

           pass

else:

           print("카드를 꺼내라")

pocket이라는 리스트 안에 money라는 문자열이 있기 때문에 if문 다음 문장 인 pass가 수행되고 아무런 결과값도 보여 주지 않음

#125페이지

#주머니에 카드가 없다면 걸어가로 , 있다면 버스 타라

>>> pocket = ['paper','cellphone','money']

>>> if 'card' in pocket:

           print("버스 타고 가라")

else:

           print("걸어 가라")


=> 다양한 조건을 판단하는 elif

주머니에 돈이 있으면 택시를 타고, 주머니에 돈이 없지만 카드가 있으면 택시를 타고, 돈도 없고 카드도 없으면 걸어 가라.

if else만으로 표현

>>> pocket = ['paper', 'cellphone']

>>> card = 1

>>> if 'money' in pocket:

           print("택시를 타고 가라")

else:

           if card:

                       print("택시를 타고 가라")

           else:

                       print("걸어 가라")


복잡함을 해결하기 위해 다중 조건 판단을 가능하게 하는 elif 사용

>>> pocket = ['paper', 'cellphone']

>>> card = True #혹은 1

>>> if 'money' in pocket:

           print("택시를 타고 가라")

elif card:

           print("택시를 타고 가라")

else:

           print("걸어 가라")


elif는 이전 조건문이 거짓일 때 수행됨

elif는 개수에 제한 없이 사용할 수 있음

=> if, elif, else를 모두 사용할 때의 기본 구조

=> if문을 한 줄로 작성하기

>>> pocket = ['paper', 'money', 'cellphone']

>>> if 'money' in pocket:

           pass

else:

           print("카드를 꺼내라")

수행할 문장이 한 줄일 때 조금 더 간략하게 코드를 작성하는 방법이 있음


>>> pocket = ['paper', 'money', 'cellphone']

>>> if 'money' in pocket:pass

else:print("카드를 꺼내라")

if문 다음 수행할 문장을 콜론(:) 뒤에 적어 주었고, else문도 마찬가지임


=> 조건부 표현식

>>> score = 70

>>> if score >= 60:

    message = "success"

else:

    message = "failure"


>>> message


조건부 표현식(conditional expression)을 사용하면 간단히 표현할 수 있음

>>> score = 70

>>> message = "success" if score >= 60 else "failure"

>>> message


조건부 표현식 정의

조건문이 참인 경우 if 조건문 else 조건문이 거짓인 경우

가독성에 유리하고 한 줄로 작성할 수 있어 활용성이 좋음


=>응용예제01. 학점 세분화 프로그램"

점수를 입력받은 후 90점 이상은 A, 80점 이상은 B, 70점 이상은 C, 60점 이상은 D,나머지는 F 로 처리하는 프로그램을 구현해 보자

score = int(input("점수를 입력하세요:"))

if score >= 90:

    grade = "A"

elif score >= 80:

    grade = "B"

elif score >= 70:

    score = "C"

elif score >= 60:

    grade = "D"

else:

    grade = "F"

print(f'{score} {grade}학점입니다.')

=>while로 변경하기 ->계속 이력 가능

while True:

    score = int(input("점수를 입력하세요:"))

    if score >= 90:

        grade = "A"

    elif score >= 80:

        grade = "B"

    elif score >= 70:

        score = "C"

    elif score >= 60:

        grade = "D"

    else:

        grade = "F"

        if score == 0:

            break

    print(f'{score} {grade}학점입니다.')

=>while로 변경하되 주석 print방식을 3가지로 확인하기

while True:

    score = int(input("점수를 입력하세요:"))

    if score >= 90:

        grade = "A"

    elif score >= 80:

        grade = "B"

    elif score >= 70:

        score = "C"

    elif score >= 60:

        grade = "D"

    else:

        grade = "F"

        if score == 0:

            break

    print("%d점은 %c학점입니다." % (score,grade))

    print(f'{score} {grade}학점입니다.')

    print("{0}점은 {1}학점입니다.".format(score,grade))


II. while

while문의 기본 구조

반복해서 문장을 수행해야 할 경우 while문을 사용함

while문의 기본구조

while문은 조건문이 참인 동안에 while문 아래에 속하는 문장들이 반복해서 수행됨

: ‘열 번 찍어 안 넘어가는 나무 없다는 속담을 while문으로 만든 예

>>> treeHit = 0

>>> while treeHit < 10:

           treeHit += 1

           print("나무를 %d번 찍었습니다." % treeHit)

           if treeHit == 10:

                       print("나무 넘어갑니다.")


=> while문이 반복되는 과정을 순서대로 정리한 표


: treeHit 1일 경우 10번까지 찍기

방안 1:

>>> treeHit = 1

>>> while treeHit <11:

    print("나무를 %d번 찍었습니다." % treeHit)

    treeHit += 1

    if treeHit == 11:

        print("나무 넘어갑니다.")

방안 2:

>>> treeHit = 1

>>> while treeHit < 11:

    print("나무를 %d번 찍었습니다." % treeHit)

    if treeHit == 10:

        print("나무 넘어갑니다.")

    treeHit += 1

방안 2가 더 좋다. 마지막에 값을 추가하는 게 메모리 측면에서 더 좋다.


=>while문 만들기

여러 가지 선택지 중 하나를 선택해서 입력 받는 예제

여러 줄의 문자열을 변수에 대입하기 위해 큰따옴표 3(“””)를 이용함

>>> prompt = """

1. Add

2. Del

3. 3.List

4. Quit

Enter number: """

>>> number = 0

>>> while number != 4:

    print(prompt)

    number = int(input())


# 결과 화면처럼 사용자가 4라는 값을 입력하지 않으면 계속해서 prompt를 출력함

1. Add

2. Del

3. 3.List

4. Quit

Enter number:

4


=> while문 강제로 빠져나가기 (break)

while문은 조건문이 참인 동안 계속해서 while문 안의 내용을 반복적으로 수행하지만 강제로 while문을 빠져나가고 싶을 때 사용하는 것이 break문임

커피 자판기 이야기를 break문으로 만든 예:

>>> coffee = 10

>>> money = 300

>>> while money:

    print("돈을 받았으니 커피를 줍니다.")

    coffee = coffee -1

    print("남의 커피의 양은 %d개입니다."  % coffee)

    if coffee == 0:

        print("커피가 다 떨어졌습니다. 판매를 중지합니다.")

        break


=>실제 자판기 작동 과정을 만든 예

coffee = 10

while True:

    money = int(input("돈을 넣어 주세요:"))

    if money == 300:

        print("커피를 줍니다.")

        coffee -= 1

    elif money > 300:

        print("거스름돈 %d를 주고 커피를 줍니다."  % (money - 300))

        coffee -= 1

    else:

        print("돈을 다시 돌려주고 커피를 주지 않습니다.")

        print("남은 커피의 양은 %d개입니다." % coffee)


    if coffee == 0:

        print("커피가 다 떨어졌습니다. 판매를 중지합니다.")

        break

=>개선 버전

# PPT_3.2_while_coffee.py

coffee = 10

while True:

    #money,cnt = input("돈과 개수를 넣어 주세요:").split()

    money = int(input("돈을 넣어 주세요:"))

    if money == 300:

        print("커피를 줍니다.")

        coffee -= 1

    elif money > 300:

        #print(money%300)

        #print(money//300)

        maxCnt = money//300

        if maxCnt > coffee:

            maxCnt = coffee

        if maxCnt > 1:

            cnt = int(input(f'%d잔 이하 가능합니다.몇잔 하시겠습니까?' % maxCnt))

        else:

            cnt = maxCnt

        print("거스롬돈 %d를 주고 커피를 줍니다." % (money - 300*cnt ))

        coffee -= cnt


    else:

        print("돈을 다시 돌려주고 커피를 주지 않습니다.")

        print("남은 커피의 양은 %d개입니다." % coffee)


    if coffee == 0:

        print("커피가 다 떨어졌습니다. 판매를 중지합니다.")

        break   

PPT_3.2_while_coffee.py을 저장한 후 프로그램을 직접 실행 함

입력란에 여러 숫자를 입력해 보면서 결과를 확인함


논리연산자

dict


if -> message = "success" if score >= 60 else "failure"


message = "A" if score >= 60 "B" elif score >= 50 else "failure"#SyntaxError: invalid syntax

#실행문이 한줄일 경우 조건문 표현식 오류


while

조건문이 안 맞을때 빠져나갈수 있지만

break도 가능하다.

continue는 만나면 처음으로 시작한다. 다음의 것 실행안한다.


while 1->참이기 때문에


=>while문의 맨 처음으로 돌아가기 (continue)

while문을 빠져나가지 않고, while문의 맨 처음(조건문)으로 다시 돌아가게 만들고 싶을 때 사용하는 것이 continue문임

>>> a = 0

>>> while a < 10:

           a += 1

           if a % 2 == 0:continue

           print(a)

a가 짝수이면 continue 문장을 수행하고, while문의 맨 처음으로 돌아감

교재 136페이지

1부터 10까지의 숫자 중에서 3의 배수를 뺀 나머지 값을 출력해 보자


=>무한 루프

무한 루프(Loop)란 무한히 반복한다는 의미임

while문의 조건문이 True이면 항상 참이므로, while문 안에 있는 문장들은 무한하게 수행됨

무한 루프의 예:

>>> while True:

           print("CTRL+C를 눌러야 while문을 빠져나갈 수 있습니다.")


응용예제01. 로그인 프로그램:

아이디와 패스워드를 입력하였을 때, 등록된 정보와 비교하여 로그인을 승인하는 프로그램을 구현해 보자.

응용예제:

myId = "python"

myPsswd = "1234"

count = 0


while True:

    #usrId = input("아이디를 입력하세요.")

    #usrPwd = input("패스워드를 입력하세요.")

    if count >= 5 :

        print("시도 횟수 초과하였습니다.")

        break

    userId, userPwd = input("아이디와 패스워드를 ,로 구분하여 입력하세요").split()


    if userId == myId and myPsswd == userPwd:

        print("정상적으로 로그인에 성공했습니다.")

        break

    elif userId != myId and myPsswd == userPwd:

        print("아이디가 틀렸습니다.\n")

    elif userId == myId and myPsswd != userPwd:

        print("패스워드가 틀렸습니다.\n")

    else:

        print("아이디와 패스워드가 틀렸습니다.\n")

    count+=1 #최대한 공간을 줄이기 위해서 마지막에 연다.

2. 별 모양 출력하기

사용자가 숫자를 여러 개 입력하면 별 모양(‘\u2605)을 입력한 숫자만큼 출력하는 프로그램이다.


실습

i = 0

while True:

    i += 1

    if i>5:break

    print("\u2605"*i+"\n")


#for

#1.

input1 = input("1.숫자를 여러 개 입력하세요 :")

for i in input1:

    print("\u2605"*int(i))

print("="*50)


#while

#2.

cnt = 0

input1 = input("2.숫자를 여러 개 입력하세요 :")

while cnt < len(input1):

    print("\u2605"*int(input1[cnt]))

    cnt+=1

print("="*50)


#3.

cnt = 0

input1 = input("3.숫자를 여러 개 입력하세요 :")

while input1[cnt:]:

    print("\u2605"*int(input1[cnt]))

    cnt+=1

print("="*50)


#4.

cnt = 0

input1 = input("4.숫자를 여러 개 입력하세요 :")

while input1[cnt]:

    print("\u2605"*int(input1[cnt]))

    cnt+=1

    if len(input1) == cnt:

        break

print("="*50)


#5.

input1 = input("5.숫자를 여러 개 입력하세요 :")

for i in range(len(input1)):

    print("\u2605"*int(input1[i]))

print("="*50)


#6.

#list내포는 result리스트로 만든다.

input1 = input("6.숫자를 여러 개 입력하세요 :")

result =["\u2605"*int(n) for n in input1]

print(result)


III. for

for문의 기본 구조

리스트나 튜플, 문자열의 첫 번째 요소부터 마지막 요소까지 차례로 변수에 대입되어 수행할 문장들이 수행됨

#변수를 i,j,k를 많이 사용

1. 전형적인 for

>>> test_list = ['one','two','three'] #list 형 자료형

>>> for i in test_list:

    print(i)


2. 다양한 for문의 사용

>>> a = [(1,2),(3,4),(5,6)]

>>> for (first,last) in a:

    print(first+last)


3. for문의 응용

5명의 학생이 시험을 보았는데 시험 점수가 60점이 넘으면 합격이고 그렇지 않으면 불합격이다. 합격인지 불합격인지 결과를 보여주시오.

우선 학생 5명의 시험 점수를 리스트로 표현함

>>> marks = [90, 25, 67, 45, 80]


#marks1.py

marks = [90, 25, 67, 45, 80]

number = 0

for mark in marks:

    number += 1

    if mark >= 60:

        print("%d번 학생은 합격입니다." % number)

    else:

        print("%d번 학생은 불합격입니다." % number)

점수 출력 및 소수점 처리

marks = [95,25,67,45,80]

number = 0

for mark in marks:

    number = number +1

    if mark >= 60:

        print("%d번 학생은 %.2f이여서 합격입니다." % (number,mark))

    else:

        print("%d번 학생은 %.2f이여서 불합격입니다." % (number,mark))


=> for문과 continue

for문 안의 문장을 수행하는 도중에 continue문을 만나면 for문의 처음으로 돌아감

#marks2.py

marks = [90, 25, 67, 45, 80]

number = 0

for mark in marks:

    number += 1

    if mark < 60 : continue

    print("%d번 학생 축하합니다. 합격입니다." % number)


=>for와 함께 자주 사용하는 range함수

>>> a = range(10)

>>> a   <--0, 1, 2, 3, 4, 5, 6, 7, 8, 9

>>> a = range(1,11)

>>> a   <--1, 2, 3, 4, 5, 6, 7, 8, 9, 10

시작 숫자와 끝 숫자를 지정하려면 range(시작 숫자, 끝 숫자) 형태를 사용하는데, 이때 끝 숫자는 포함되지 않음


==>range 함수의 예시 살펴보기

for range 함수를 이용하여 1부터 10까지 더하는 것을 구현함


>>> add = 0

>>> for i in range(1,11):

    add += i


>>> add


#marks3.py

marks = [90, 25, 67, 45, 80]

for number in range(len(marks)):

    if marks[number] < 60:continue

    print("%d번 학생 축하합니다. 합격입니다. " % (number + 1))


==> for range를 사용한 구구단

>>> for i in range(2,10):

    for j in range(1,10):

        print(i * j , end = " ")

    print('')


for i in range(1,10):

    for j in range(1,10):

        print(i*j, end=" ")#출력할 때 다음 줄로 넘기지 않고 그 줄에 계속 출력함

    print(' ')


==>실제 수자로 보고싶다.

>>> a= list(range(len(marks)))

>>> a


=> 리스트 내포 사용하기

리스트 안에 for문을 포함하는 리스트 내포(List comprehension)를 사용하면 편리함

>>> a = [1,2,3,4]

>>> result=[]

>>> for num in a:

    result.append(num*3)


>>> result

리스트 내포를 사용하면 간단히 해결할 수 있음

>>> a = [1, 2, 3, 4]

>>> result = [num * 3 for num in a]

>>> result

>>> [num * 3 for num in a]  ->거짓이면 대입자체가 안되서


=> 짝수에만 3을 곱하여 담고 싶다면 리스트 내포 안에 ‘if 조건을 사용함

>>> a = [1,2,3,4]

>>> result = [num * 3 for num in a if num % 2 ==0]

>>> result


***리스트 내포의 일반적인 문법

[표현식 for 항목 in 반복 가능 객체 if 조건]

***for문을 여러 개 사용할 때의 문법


=> 구구단의 모든 결과를 리스트에 담고 싶다면 리스트 내포를 사용하여 구현함

>>> result = [x*y for x in range(2,10)

                     for y in range(1,10)]

>>> result


>>> result = [x*y*z for x in range(2,10)

                for y in range(1,10)

                for z in range(1,10)]

>>> result


==>for문을 사용해 1부터 100까지 출력하기

>>> for i in range(100):

    print(i+1,end=" ")


==>while문으로 바꾸기

>>> i = 0

>>> while i < 100:

    i+=1

    print(i,end=" ")


==>평균점수 구하기

방안 1:

>>> scores = [70,60,55,75,95,90,80,80,85,100]

>>> total = 0

>>> for score in scores:

               total += score


>>> total/ len(scores)


방안 2:

>>> scores = [70,60,55,75,95,90,80,80,85,100]

>>> total = 0

>>> for i in range(len(scores)):

               total += scores[i]


>>> total/ len(scores)


>>> numbers = [1,2,3,4,5]

>>> result = []

>>> for n in numbers:

    if n%2 != 0 :

        result.append(n*2)


>>> result


>>> numbers = [1,2,3,4,5]

>>> result = []

>>> result = [num* 2 for num in numbers if num%2 != 0]

>>> result


treeHit=0

for i in range(10):

    treeHit =  i+1

    print("나무를 %d를 찍었습니다" % treeHit)

print("나무 넘어갑니다.")


>>> a = [(1,2),(3,4),(5,6)]

>>> for(first,last) in a:

    print(first+last)


연습문제 146페이지

1.

>>> a = "Life is too short, you need python"

>>> if "wife" in a: print("wife")

elif "python" in a and "you" not in a: print("python")

elif "shirt" in a: print("shirt")

elif "need" in a: print("need")

else: print("none")


2.

>>> result = 0

>>> i = 1

>>> while i <= 1000:

    if i % 3 == 0:

        result += i

    i += 1


>>> result


3.

>>> i = 0

>>> while True:

    i+= 1

    if i > 5 :break

    print("*" * i)


4.

>>> for i in range(1,101):

    print(i)


5.

A= [70,60,55,75,95,90,80,85,85,100]

total = 0

for score in A:

    total += score

average = total/len(A)

print(average)


6.

numbers = [1,2,3,4,5]

result = []

for n in numbers:

    if n % 2 == 1:

        result.append(n*2)


numbers = [1,2,3,4,5]

result = [n*2 for n in numbers if n % 2 == 1]

print(result)

반응형

'Study > Python' 카테고리의 다른 글

python-6  (0) 2020.09.10
python-5  (0) 2020.09.09
python-4  (0) 2020.09.08
python-2  (0) 2020.09.07
python-1  (0) 2020.09.06

+ Recent posts