아래 내용은 Udemy에서 Pytorch: Deep Learning and Artificial Intelligence를 보고 정리한 내용이다.
31. What is Convolution?(par1)
convolutional neural networks
add
multiply
3 object
input image * filter (kernel) = output image
Convolution = Image Modifier
Image
10
20
30
40
0
1
0
1
30 0
10
20
0
10
20 30
* Filter
output
1*10+0*20+0*0+1*2 = 12
1*20+0*20+0*1+2*0 = 20
excercise: Write Pseudocode
input_image, kernel
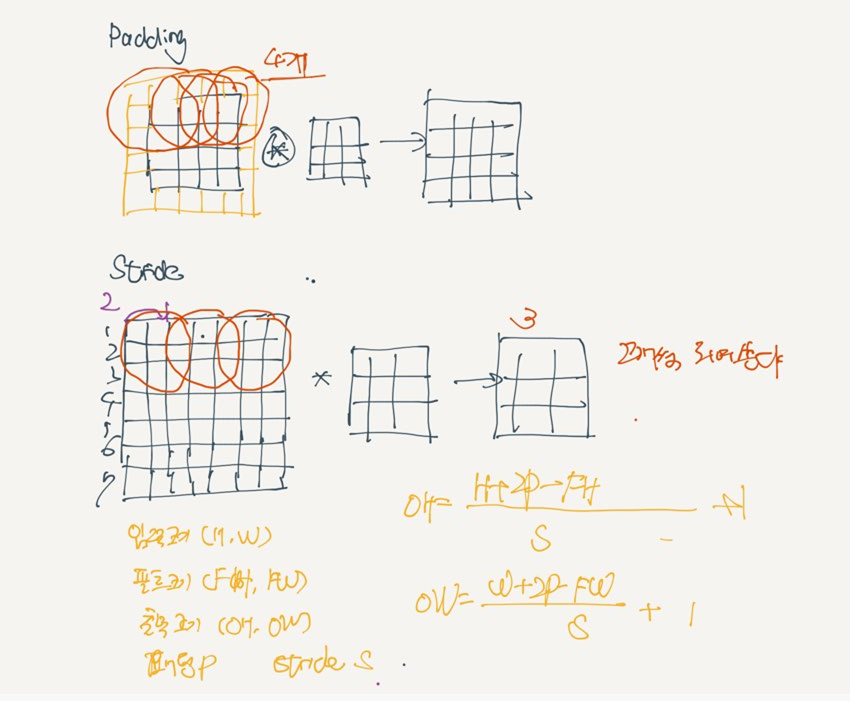
output_height = input_height- kernel_height+1
output_width = input_width - kernel_width +1
mode ='valid'
ouput input is samller than input
padding "same" mdoe
same size as the input
full mode
we could extend the filter further and still get non-zero outputs
"Full" padding;
input length = N
Kernel length = K
Output length = N+K-1
INPUT LENGTH N kernel k
mode
output size
usae
valid N-K +1
typical
same N
typical
full N+K-1
Atypical
32. what is convolution ?(part2)
convolution as "pattern finding"
cos similiraty
dot product
high positive correlation -> dot product is large and positive
high negative correlation -> dot product is large and negative
no correlation -> dot product is zero
33. what is convolution?(part3)
optional understanding
1-d convolution
matrix multiplication
2-d convolution
matric multiplication
color?
Translational Invariance: 위치 다르게 가능하다.
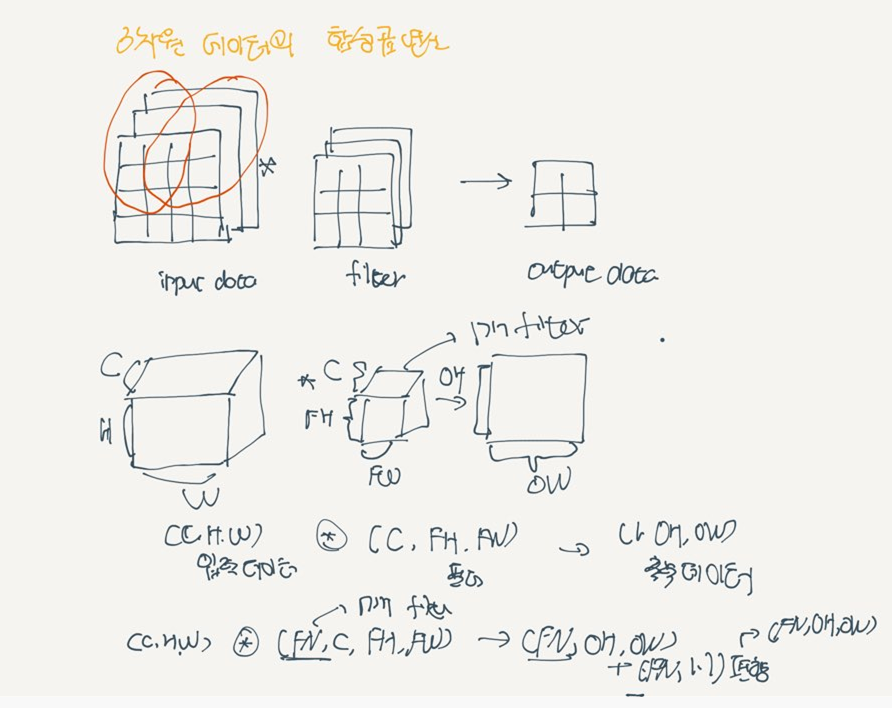
34. convolution on color images
3-d objects : Height x width x color
pooling
downsample by 2
3-D same size in depth dimension
input image HxWx3
kernel : KxKx3
output image:(H -K +1) x ( W-K +1)
how much do we save?
input image : 32x 32 x 3
filter : 3x5x5x 64
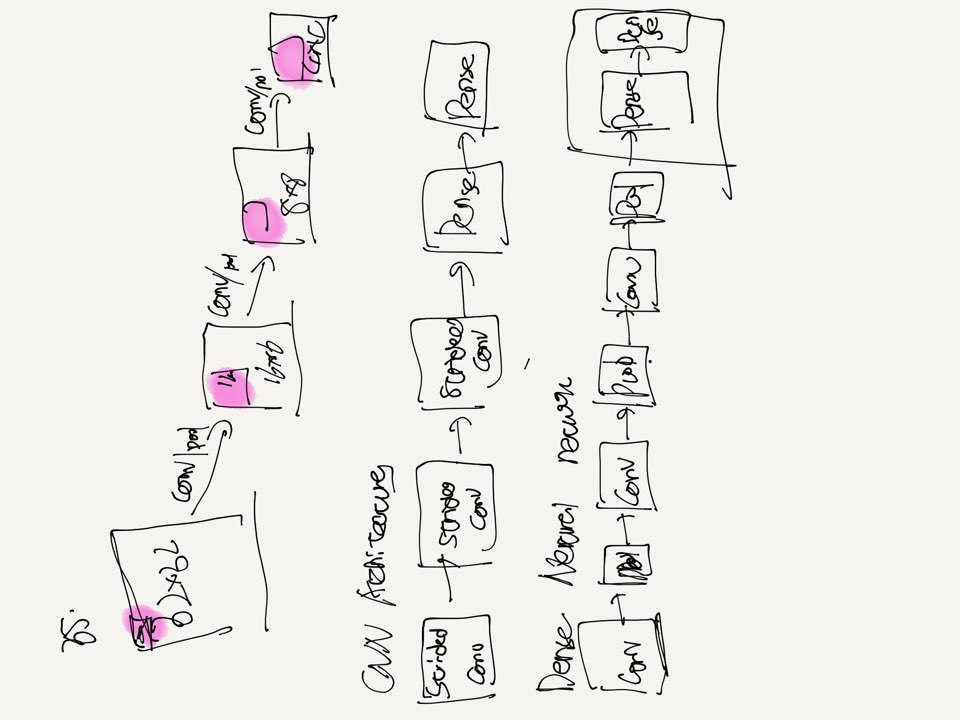
35. cnn architecture
CNN has two steps:
pooling
high level, pooling is downsampling
eg. output a smaller images from a bigger image
input 100x100 => pool size of 2 woule yield 50x50
Max pooling, average pooling
Max pooling :
why use pooling?
pattern finder에서 pattern이 found한 곳만 찾기 위해서 이다.
diferent pool sizes
stride : overlap이 가능하다.
pooling
conv-pool shrinks
losing information
Dowe lose information if we shrink the image ? Yes!
We lose spatial information : we don't care where the feature was found
hyperparameters:
learning rate, hidden layers, hidden units per layer
pixel
Dense Neural Network: 1xD layer
global max pooling
36. cnn code preparation(part1)
build the model
C1 x H x W x C2
nn.Conv2d(in_channels =1, out_channels = 32, kernel_size = 3, stride =2)
color images 3-d
color is not a spatial dimension
1-D convolution example: time series
3-D convolution example: video (height, width, time)
3-D convolution example: voxels(height, width, depth)
"Voxel" = "Volume Element"
conv2d -> conv2d -> conv2d -> flatten -> Dense -> Dense
conv2d = Image
Dense = Vector
ANN Review
model = nn.Sequential(
nn.Linear( 784 , 128 ),
nn.ReLU(),
nn.Linear( 128 , 10 )
)
class ANN(nn.Modeuls):
def __init__(self):
super(ANN, self).__init__()
self.layer1= Linear(784 , 128 ),
self.layer2= ReLU()
self.layer3 =Linear(128,1)
def forward(self, x):
x = self.layer1(x)
x = self.layer2 (x)
x = self.layer3 (x)
return x
model = ANN()
Linear model
variable = nn.Linear(D,1)
outputs = variable(inputs)
class CNN(nn. Module ):
def __init__(self):
super(CNN , self).__init__()
self.conv = nn.Sequential(
nn.Conv2d(2, 32
nn.Conv2d(32 , 64 , kernel_size =3, stride=2)
nn.Conv2d(64 , 128, kernel_size =3, stride=2)
)
self.dense = nn.Sequential(
nn.Linear(? , 1024 )
nn.Linear(1024 , K))
def forward(self, x):
out = self.conv(x)
out = out.view(-1,?)
out = self.dense(out)
return out
CNN Sequentail version
model = nn.Sequential(
nn.Conv2d(3, 32, kernel_size=3, stride =2)
nn.Conv2d(32 , 64, kernel_size=3, stride =2)
nn.Conv2d(64 , 128, kernel_size=3, stride =2)
nn.Flatten()
nn.Linear(?, 1024)
nn.Linear(1024, K)
)
dropout Regularization:
L1 and L2 Regularization
dense layers
보통 dropout는 dense layer 사이에 사용한다.convolutions에 사용하지 않는다.
and sometimes RNNs
37. cnn code preparation(part2) fill in the detaill
Convolutioanal Arithmetic
model = nn.Sequential(
nn.Conv2d(3, 32, kernel_size=3, stride =2)
nn.Conv2d(32 , 64, kernel_size=3, stride =2)
nn.Conv2d(64 , 128, kernel_size=3, stride =2)
nn.Flatten()
nn.Linear(? , 1024)
nn.Linear(1024, K)
)
keras
32->16->8->4
"padding" argument
중요한 점
pytorch 특이한 점
why NxCxHxW and not NxHxWxC?
Conventions = whatever the programmer decided to do
Theano / Pytorch == channels first
OpenCV, Tensorflow, Matplotlib, pillow == channels last
OpenDV == BGR instead of RGB (try imread and then plot with Maplotlib)
38. cnn code preparation(part3) 1.load in the data
Fashion MNIST and CIFAR -10
2. BUILD THE MODEL ->convolutional
3. TRAIN the model
4. evaluate the model
5. make predictions
"all machine learning interfaces are the same"
load in the data
data augmentation
Pytorch loading in the data
train_dataset = torchvision.datasets.FashionMNIST(
root = '.' ,
train = True ,
transform = transforms.ToTensor(),
download = True )
train_dataset = torchvision.datasets.CIFAR10(
root = '.' ,
train = True ,
transform = transforms.ToTensor(),
download = True )
train_loader = torch.utils.data.DataLoader(dataset = train_dataset, batch_size = batch_size, shuffle = True )
all data is the same
all machine learning interfaces are the same
Training loop
for i in rage(epochs):
for inputs, targets in data_loader:
...
evaluating accuracy
for inputs, targets in data_loader:
...
39. cnn for fashion mnist import torch
import torch.nn as nn
import torchvision
import torchvision.transforms as transforms
import numpy as np
import matplotlib.pyplot as plt
from datetime import datetime
train , test set 가져오기
train_dataset = torchvision.datasets.FashionMNIST(
  root = '.',
  train = True,
  transform = transforms.ToTensor(),
  download = True)
test_dataset = torchvision.datasets.FashionMNIST(
root = '.',
train = False,
transform = transforms.ToTensor(),
download = True)
class 종류 확인하기
classes = len(set(train_dataset.targets.numpy()))
print("number of classes:", classes)
class CNN(nn.Module):
  def __init__(self, classes):
    super(CNN, self).__init__()

    self.conv_layers = nn.Sequential(
      nn.Conv2d(in_channels=1, out_channels = 32, kernel_size =3, stride=2),
      nn.ReLU(),
      nn.Conv2d(in_channels=32, out_channels = 64, kernel_size =3, stride=2),
      nn.ReLU(),
      nn.Conv2d(in_channels=64, out_channels = 128, kernel_size =3, stride=2),
      nn.ReLU()
    )
    self.dense_layers = nn.Sequential(
      nn.Dropout(0.2),
      nn.Linear(128*2*2, 512),
      nn.ReLU(),
      nn.Dropout(0.2),
      nn.Linear(512, classes)
    )

  def forward(self, x):
    out = self.conv_layers(x)
    out = out.view(out.size(0), -1)
    out = self.dense_layers(out)
    return out
model = CNN(classes)
다른 또 한가지 방법 tensorflow
'''
model = nn.Sequential(
  nn.Conv2d(in_channels=1, out_channels = 32, kernel_size =3, stride=2),
  nn.ReLU(),
  nn.Conv2d(in_channels=32, out_channels = 64, kernel_size =3, stride=2),
  nn.ReLU(),
  nn.Conv2d(in_channels=64, out_channels = 128, kernel_size =3, stride=2),
  nn.ReLU(),
  nn.Flatten(),
  nn.Dropout(0.2),
  nn.Linear(128*2*2, 512),
  nn.ReLU(),
  nn.Dropout(0.2),
  nn.Linear(512, classes)
)
'''
model to gpu
device = torch.device("cuda:0" if torch.cuda.is_available() else 'cpu')
print(device)
model.to(device)
criterion = nn.CrossEntropyLoss()
optimizer = torch.optim.Adam(model.parameters())
batch_size = 128
train_loader = torch.utils.data.DataLoader(dataset = train_dataset, batch_size = batch_size, shuffle = True)
test_loader = torch.utils.data.DataLoader(dataset = test_dataset, batch_size = batch_size, shuffle = False)def batch_gd(model, criterion, optimizer, X_train, y_train, epochs):
train_losses = np.zeros(epochs)
test_losses = np.zeros(epochs)
for epoch in range(epochs):
t0 = datetime.now()
train_loss = []
for inputs, targets in train_loader:
inputs, targets = inputs.to(device), targets.to(device)
optimizer.zero_grad()
outputs = model(inputs)
loss = criterion(outputs, targets)
loss.backward()
optimizer.step()
train_loss.append(loss.item())
train_loss = np.mean(train_loss)
test_loss = []
for inputs, targets in test_loader:
inputs, targets = inputs.to(device), targets.to(device)
outputs = model(inputs)
loss = criterion(outputs, targets)
test_loss.append(loss.item())
test_loss = np.mean(test_loss)
train_losses[epoch] = train_loss
test_losses[epoch] = test_loss
dt = datetime.now() - t0
print(f'Epoch{epoch+1}/{epochs}, Train loss:{train_loss:.4f}, Test loss:{test_loss:.4f}')
return train_losses, test_lossestrain_losses, test_losses = batch_gd(model, criterion, optimizer, train_loader, test_loader, epochs=15)정확도 구하기
n_correct = 0.
n_total = 0.
for inputs, targets in train_loader:
inputs, targets = inputs.to(device), targets.to(device)
outputs = model(inputs)
_, predictions = torch.max(outputs, 1)
n_correct += (predictions == targets).sum().item()
n_total+= targets.shape[0]
train_acc = n_correct/ n_total
n_correct = 0.
n_total = 0.
for inputs, targets in test_loader:
inputs, targets = inputs.to(device), targets.to(device)
outputs = model(inputs)
_, predictions = torch.max(outputs, 1)
n_correct += (predictions == targets).sum().item()
n_total+= targets.shape[0]
test_acc = n_correct/ n_total
print(f"Train acc: {train_acc:.4f} , Test acc:{test_acc:.4f}")from sklearn.metrics import confusion_matrix
import numpy as np
import itertools
def plot_confusion_matrix(cm, classes, normalize = False, title =' Confusion matrix', cmap = plt.cm.Blues):
if normalize:
cm = cm.astype('float') / cm.sum(axis=1)[:, np.newaxis]
print("Normalized confusion matrix")
else:
print("confusion_matrix: without Normalized")
print(cm)
plt.imshow(cm, interpolation='nearest', cmap=cmap)
plt.title(title)
plt.colorbar()
tick_marks = np.arange(len(classes))
plt.xticks(tick_marks, classes, rotation = 45)
plt.yticks(tick_marks, classes)
fmt ='.2f' if normalize else 'd'
thresh = cm.max()/2
for i, j in itertools.product(range(cm.shape[0]), range(cm.shape[1])):
plt.text(j, i, format(cm[i,j], fmt), horizontalalignment="center" , color="white" if cm[i, j]> thresh else 'black')
plt.tight_layout()
plt.ylabel('True label')
plt.xlabel('Predicted label')
plt.show()
x_test = test_dataset.data.numpy()
y_test = test_dataset.targets.numpy()
p_test = np.array([])
for inputs, targets in test_loader:
inputs = inputs.to(device)
outputs = model(inputs)
_, predictions = torch.max(outputs, 1)
p_test = np.concatenate((p_test, predictions.cpu().numpy()))
cm = confusion_matrix(y_test, p_test)
plot_confusion_matrix(cm, list(range(10)))
p_test = p_test.astype(np.uint8)
misclassfied_idx = np.where(p_test != y_test)[0]
i = np.random.choice(misclassfied_idx)
plt.imshow(x_test[i].reshape(28,28) , cmap = 'gray')
plt.title('True label: %s Predicted : %s' % (labels[y_test[i]], labels[p_test[i]]))cnn better than ann
40. cnn for cifar-10 import torch
import torch.nn as nn
import torchvision
import torchvision.transforms as transforms
import numpy as np
import matplotlib.pyplot as plt
from datetime import datetime
cifar 10 dataset color imageset
train_dataset = torchvision.datasets.CIFAR10(
root = '.',
train = True,
transform = transforms.ToTensor(),
download = True)
test_dataset = torchvision.datasets.CIFAR10(
root = '.',
train = False,
transform = transforms.ToTensor(),
download = True)cifar 10 regular
classes = len(set(train_dataset.targets))
print("number of classes: " , classes)dataloader
batch_size = 128
train_loader = torch.utils.data.DataLoader(dataset = train_dataset, batch_size = batch_size, shuffle = True)
test_loader = torch.utils.data.DataLoader(dataset = test_dataset, batch_size = batch_size, shuffle = False)cnn 정의 한다.
class CNN(nn.Module):
  def __init__(self, classes):
    super(CNN, self).__init__()
    self.conv1 = nn.Conv2d(in_channels=3, out_channels = 32, kernel_size =3, stride=2)
    self.conv2 = nn.Conv2d(in_channels=32, out_channels = 64, kernel_size =3, stride=2)
    self.conv3 = nn.Conv2d(in_channels=64, out_channels = 128, kernel_size =3, stride=2)
    self.fc1 = nn.Linear(128*3*3, 1024)
    self.fc2 = nn.Linear(1024, classes)

  def forward(self, x):
    x = F.relu(self.conv1(x))
    x = F.relu(self.conv2(x))
    x = F.relu(self.conv3(x))
    x = x.view(-1, 128*3*3)
    x = F.dropout(x, p =0.5)
    x = F.relu(self.fc1(x))
    x = F.dropout(x, p =0.2)
    x = self.fc2(x)
    return x
model = CNN(classes)
41. data augmentation
generators/ iterator
0.. 10: for i in range(10)
python 2 range(10)
python 2, use xrange(10)
python 3, print(range(10))
.....
for x in my_image_aumgmentation_generator():
print(x)
def my_image_aumgmentation_generator():
for x_batch, y_batch in zip(X_train, y_train):
x_batch = gument(x_batch)
yield x_batch, y_batch
Data augmentation with Torch Vision
transform = torchvision.transforms.Compose ([
torchvision.transforms.ColorJitter(
brightness=0.2, contrast = 0.2, saturation =0.2, hue =0.2),
torchvision.transforms.RandomHorizontailFlip(p=0.5),
torchvision.transforms.RandomRotation(degrees=15),
transforms.ToTensor(),
)
])
train_dataset = torchvision.datasets.CIFAR10(
root = '.',
train=True,
transform = transform,
download = True
)
dataloader은 그래도 한다. 이전과 같이 진행하면 된다.
Data Augmentation with your data
train_dataset = torchvision.datasets.yourdataset?(
root = '.',
train=True,
transform = transforms.ToTensor(),
download = True
)
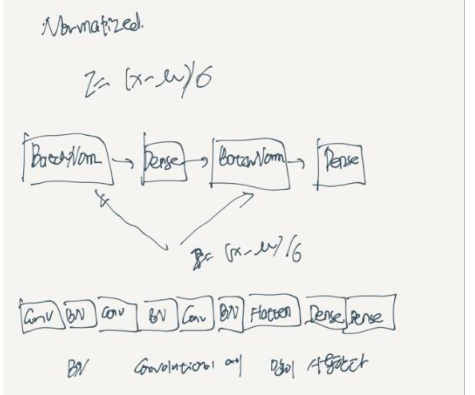
42. Batch Normalization
z = (x - μ) / σ
for epoch in ragne(epochs):
for x_batch, y_batch in data_loader:
x<- w - learning_rate * grad(x_batch , y_batch)
Dense 사이에 한다.
Batch Norm as regularization
can help with overfitting
43. Improving CIFAR -10 Results
pytorch data augmentation
data augmentation
train_transform = torchvision.transforms.Compose([
  tranforms.RandomCrop(32, padding = 4),
  torchvision.transforms.RandomHorizontalFlip(p=0.5),
  torchvision.transforms.RandomAffine(0, translate=(0.1,0.1)),
  tranforms.ToTensor(),
])

train_dataset = torchvision.datasets.CIFAR10(
  root = '.',
  train = True,
  transform = train_transform,
  download = True)

test_dataset = torchvision.datasets.CIFAR10(
  root = '.',
  train = False,
  transform = train_transform,
  download = True)
모델 생성
maxpooling
class CNN(nn.Module):
  def __init__(self, classes):
    super(CNN, self).__init__()
    self.conv1 = nn.Sequential(
        nn.Conv2d(3, 32, kernel_size= 3, padding =1 ),
        nn.ReLU(),
        nn.BatchNorm2d(32),
        nn.Conv2d(32, 32, kernel_size=3, padding=1),
        nn.ReLU(),
        nn.BatchNorm2d(32),
        nn.MaxPool2d(2),
    )
    self.conv2 = nn.Sequential(
        nn.Conv2d(32, 64, kernel_size= 3, padding =1 ),
        nn.ReLU(),
        nn.BatchNorm2d(64),
        nn.Conv2d(64, 64,kernel_size=3, padding=1),
        nn.ReLU(),
        nn.BatchNorm2d(64),
        nn.MaxPool2d(2),
    )
    self.conv3 = nn.Sequential(
        nn.Conv2d(64, 128, kernel_size= 3, padding =1 ),
        nn.ReLU(),
        nn.BatchNorm2d(128),
        nn.Conv2d(128, 128,kernel_size=3, padding=1),
        nn.ReLU(),
        nn.BatchNorm2d(128),
        nn.MaxPool2d(2),
    )
    self.fc1 = nn.Linear(128 * 4 * 4, 1024)
    self.fc2 = nn.Linear(1024, classes)
  def forward(self, output):
    output = self.conv1(output)
    output = self.conv2(output)
    output = self.conv3(output)
    output = output.view(output.size(0) , -1)
    output = F.dropout(output, p = 0.5)
    output = F.relu(self.fc1(output))
    output = F.dropout(output, p = 0.2)
    output = self.fc2(output)
    return output
vgg mach larger images
from torchsummary import summary
summary(model, (3,32,32))